


Submit Your Comments
Please enter your comments in the box below and then click the Submit Your Comment button and enter the anti-spam code when prompted. You can edit your comment subsequently. Comments which we regard as irrelevant may be removed without notice.
Some of you have recently expressed interest in hardanger, so we decided to research the subject a little and look for a few products.
Hardanger is named after a region in Norway and was traditionally worked with white thread on white fabric. It is a drawn thread technique which can be used to decorate linen and clothing. More modern designs use colour and added cross stitch.
The fabric used must be evenweave and the satin stitches around the cut areas are always worked first rather like making buttonholes. Threads used can be pearl cottons or stranded cottons. After the edges of the design have been completed the threads are then cut with very sharp scissors and drawn out first in one direction and then in the other. The work can be decorated further with bars with picots or eyelets. More complicated designs can be worked by weaving on the remaining threads and give an effect like filigree work.
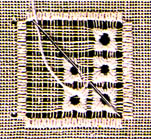
Here's a simple example.
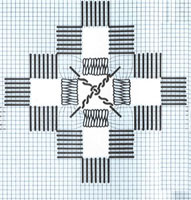
On 28 count fabric, work the satin stitch blocks in the shape shown on the left using No.5 pearl cotton and a no. 20 tapestry needle. This should be worked on an embroidery frame.
The satin blocks are worked over seven spaces since there's one each side of the threads to be cut and you have to take great care to keep these stitches straight and not to miss a space as it starts to get a bit crowded because the cotton is thicker than you would normally use for the spacing.

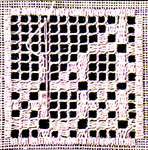
Four sided filling stitch
Common hardanger Stitches
Here are some diagrams of other common hardanger stitches cording and woven bars with picot. Buttonhole stitches are often used in edgings to give a patterned edge.
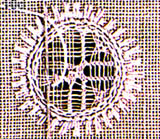
These photos show weaving in a more detailed pieces, where larger areas have some threads drawn and the remaining threads then have stitching woven in layers often giving the final appearance of leaves and flowers.
We have found some hardanger booklets, three by Linda Driskell, a Christmas design with holly and berries from Cross 'N Patch and a collection of Christmas ornaments from Hermanson Hardanger.
Linda Driskell gives very clear instructions with detailed diagrams and her booklets are really aimed at teaching the art.
Cross 'N Patch gives detailed instructions with stitch diagrams but Linda Hermanson of gives no stitch diagrams assuming that the readers are not novices at hardanger.
Permin of Copenhagen supply several hardanger kits and we have chosen three small pillows in white, which would make an interesting introductory project, and four larger table runners and table centres for stitchers who feel confident about working in this style. Permin kits have some stitching instructions but only in diagram form and are not very detailed.
If you do decide to have a try at this style of embroidery, the most important tool is a good pair of sharp scissors. One trick is to use a large needle to enlarge the space where you want to cut to make room for the scissor point.
I'm sure you will find the finished article worth the effort.
Hardanger is named after a region in Norway and was traditionally worked with white thread on white fabric. It is a drawn thread technique which can be used to decorate linen and clothing. More modern designs use colour and added cross stitch.
The fabric used must be evenweave and the satin stitches around the cut areas are always worked first rather like making buttonholes. Threads used can be pearl cottons or stranded cottons. After the edges of the design have been completed the threads are then cut with very sharp scissors and drawn out first in one direction and then in the other. The work can be decorated further with bars with picots or eyelets. More complicated designs can be worked by weaving on the remaining threads and give an effect like filigree work.
Here's a simple example.
On 28 count fabric, work the satin stitch blocks in the shape shown on the left using No.5 pearl cotton and a no. 20 tapestry needle. This should be worked on an embroidery frame.
The satin blocks are worked over seven spaces since there's one each side of the threads to be cut and you have to take great care to keep these stitches straight and not to miss a space as it starts to get a bit crowded because the cotton is thicker than you would normally use for the spacing.
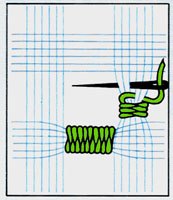
- Take the fabric from the frame and complete the stitching without a frame.
- Carefully cut the 6 central horizontal threads and pull them out followed by the six central vertical threads.
- Then the four blocks so that you have five square holes in all.
Four sided filling stitch
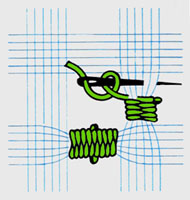
- Two twisted bands are worked by carrying the yarn diagonally across the space, entering the fabric and twisting the yarn over the first thread back to the starting point.
- The twisting of the second bar is taken only to the centre.
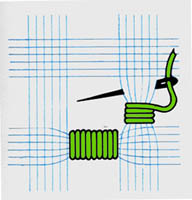
- Then the yarn is passed over and under the bars twice in a circular motion and then under and over twice.
- Finally the other half of the second bar is completed.
Common hardanger Stitches
Here are some diagrams of other common hardanger stitches cording and woven bars with picot. Buttonhole stitches are often used in edgings to give a patterned edge.
These photos show weaving in a more detailed pieces, where larger areas have some threads drawn and the remaining threads then have stitching woven in layers often giving the final appearance of leaves and flowers.
Hardanger Charts and Kits
We have found some hardanger booklets, three by Linda Driskell, a Christmas design with holly and berries from Cross 'N Patch and a collection of Christmas ornaments from Hermanson Hardanger.
Linda Driskell gives very clear instructions with detailed diagrams and her booklets are really aimed at teaching the art.
Cross 'N Patch gives detailed instructions with stitch diagrams but Linda Hermanson of gives no stitch diagrams assuming that the readers are not novices at hardanger.
Permin of Copenhagen supply several hardanger kits and we have chosen three small pillows in white, which would make an interesting introductory project, and four larger table runners and table centres for stitchers who feel confident about working in this style. Permin kits have some stitching instructions but only in diagram form and are not very detailed.
If you do decide to have a try at this style of embroidery, the most important tool is a good pair of sharp scissors. One trick is to use a large needle to enlarge the space where you want to cut to make room for the scissor point.
I'm sure you will find the finished article worth the effort.

Please wait ...

